AreaShot User Guide
A lightweight Windows tool built around a carefully chosen set of screenshot features for work and everyday use.
Capture, share and keep screenshots in as few steps as possible.
- STEP 1Start with a shortcut
Ctrl+Alt+S - STEP 2Drag to select the area
- STEP 3Copy, save or edit (or just hold a key)
- STEP 4Paste into Teams or your documents
Contents
What is AreaShot?
AreaShot is a screenshot app built around a carefully chosen set of features for work and everyday use. Rather than packing in every possible feature, it focuses on making a daily task as quick as possible: capturing part of the screen and handing it to someone, or keeping it in a document.
AreaShot stays in the notification area. Press the shortcut and select an area to capture it. You can then copy the image to the clipboard, save it to a file, or add rectangles, arrows and text in a simple editor.
Where it helps and key features (also on the overview page)
Capture and share in seconds
Select an area, then copy it to the clipboard or save it to a file right away.
Even faster with keys
Besides the menu, you can hold a key while releasing the mouse to copy, save or edit without opening the dialog.
Mark up before pasting into Teams
Before pasting into a Teams chat or channel, quickly add a rectangle, arrow or text to show exactly where to look.
Just enough drawing for guides
For operation manuals and how-to guides: lines, rectangles, arrows and text to highlight, plus mosaic to hide what should not be shown.
Requirements
| OS | Windows 11 (64-bit) |
|---|---|
| Display language | English and Japanese (follows the Windows display language automatically, or choose one in Settings) |
| Where to get it | Install AreaShot for free from the Microsoft Store. |
Starting AreaShot
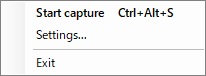
When you start AreaShot, no window opens. An icon appears in the notification area at the bottom right of the screen, and AreaShot waits there. The first time you start it, a notification shows that AreaShot is running and which shortcut starts a capture.
 (open full-size image)
| Menu item | Description |
|---|---|
| Start capture | Starts selecting an area. The registered shortcut is shown on the right. You can also double-click the icon. |
| Settings... | Opens Settings. |
| Exit | Exits AreaShot. Closing a window with the × button does not exit AreaShot; it keeps running. |
If you cannot see the icon, check the hidden icons area (^) on the taskbar. If you start AreaShot a second time, a notification tells you that it is already running.
Capturing an area
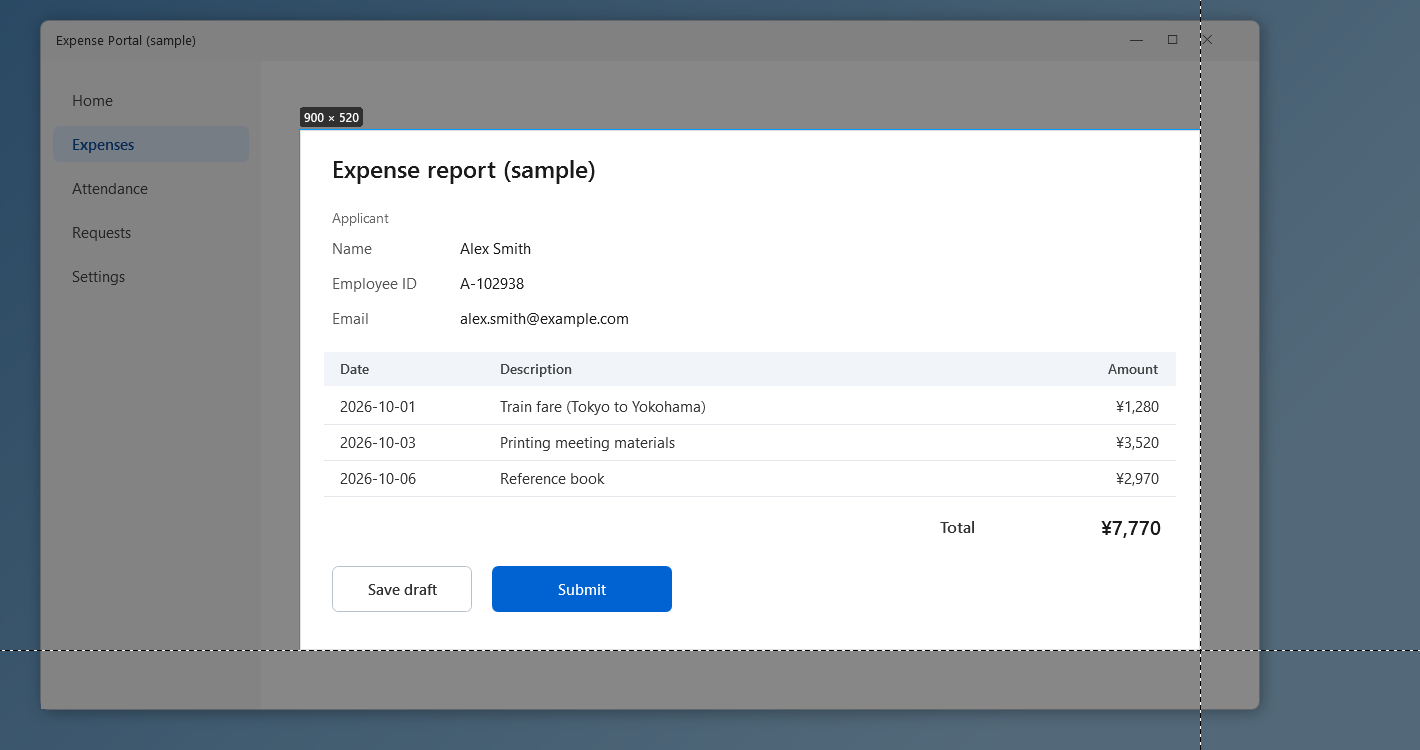
- Press Ctrl+Alt+S (you can change the shortcut in Settings). The whole screen dims slightly, and guide lines follow the mouse.
- Drag from one corner of the area to the opposite corner. You can drag in any direction.
- Release the mouse to confirm the area. The capture dialog appears.
 (open full-size image)
- AreaShot captures the screen as it was when you pressed the shortcut. Even if the screen changes while you select, the result is the screen at that moment.
- The size shown (for example
900 × 520) is the size of the saved image. - The mouse pointer, guide lines, selection frame and key hints are not included in the image.
- Multiple monitors, including monitors with different scaling (125%, 150% and so on), are supported. You can also select an area that spans monitors.
- To cancel, press Esc or right-click. Right-clicking while dragging starts the selection over.
After capturing
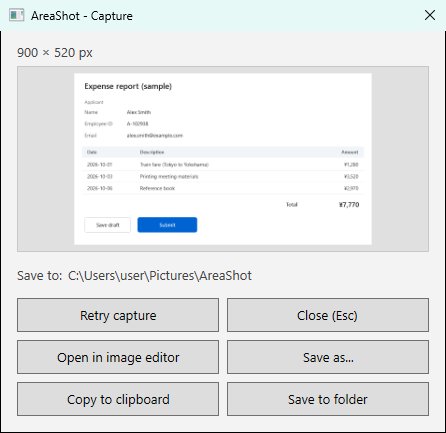
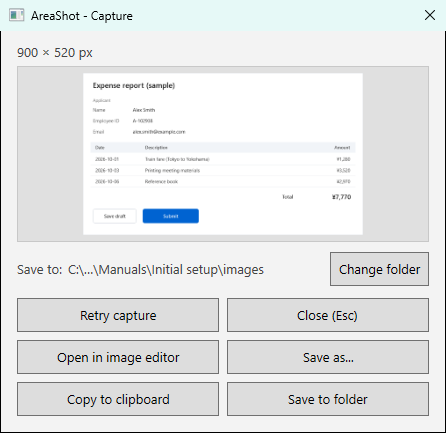
After you select an area, a dialog with a preview appears. It opens so that the "Copy to clipboard" button sits right where you released the mouse, so a single click copies the image.
 (open full-size image)
Below the preview, the folder that "Save to folder" saves to is shown. When the file naming is "Sequential number" or "Sequential number + description", you can switch the folder with "Change folder" next to it (see Saving with sequential numbers). Long paths are shortened with "…"; hover over the path to see all of it.
| Button | Key | Action |
|---|---|---|
| Copy to clipboard | C / Enter | Copies the image. Paste it into Teams, Outlook, Word, PowerPoint and so on with Ctrl+V. |
| Save to folder | S | Saves to the folder shown, using the file naming you set. With "Sequential number + description", you enter a description first (see Saving and file names). |
| Save as... | A | Saves with the standard Windows save dialog, where you choose the location and name. |
| Open in image editor | E | Opens the image editor to add rectangles, arrows, text and mosaic. |
| Retry capture | R | Discards this image and starts selecting again. |
| Close | Esc | Discards the image and goes back to waiting (AreaShot does not exit). |
To prevent accidental clicks right after selecting, the dialog ignores mouse clicks for 0.3 seconds after it appears. Keys work immediately.
Hold and release (quick actions)
If you hold a key while releasing the mouse after selecting an area, AreaShot runs that action right away without the dialog. You can press the key at any time during the drag; only the keys held at the moment of release count. If you release without holding a key, the dialog appears as usual.
| Key to hold (default) | Action |
|---|---|
| Ctrl | Copy to clipboard |
| Shift | Open in image editor |
| Ctrl+Shift | Save to folder |
| Alt | Save as |
While you select an area, key hints are shown at the bottom of the screen. When you hold a key, the action that will run on release is highlighted in light blue. (If the selection or the mouse covers the hints, they move to the top of the screen.)
 (open full-size image)
 (open full-size image)
 (open full-size image)
You can change the keys, turn the feature on or off, and show or hide the hints in Settings. If saving fails, or if you cancel the save dialog, the capture dialog appears so that you do not lose the image. When the file naming is "Sequential number + description", the key for "Save to folder" opens the description window (if you cancel it, the capture dialog appears).
Saving and file names
File naming
The file name that "Save to folder" uses can be chosen from the following three in "File naming" in Settings (from version 1.3.0). The image format (PNG or JPEG) can be chosen with any of them.
| File naming | Example | Saved to | After "Save to folder" |
|---|---|---|---|
| File name template (default) | 261013153000_capture.png | Save folder | Saved right away |
| Sequential number | 001.png | Folder for sequential numbers | Saved right away |
| Sequential number + description | 001_Open settings.png | Folder for sequential numbers | Saved after you enter a description |
For how to use sequential numbers, see Saving with sequential numbers.
Save to folder (file name template)
Saves the image to your save folder with a name made from the template. The default template uses the capture date and time, so you do not need to think of a name or choose a location, which is handy when you take many captures in a row.
| Item | Default |
|---|---|
| Save folder | Pictures\AreaShot (created if it does not exist) |
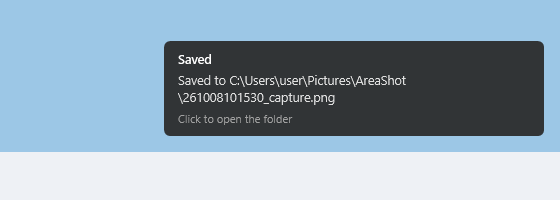
| Template | {yy}{MM}{dd}{HH}{mm}{ss}_capture (for example 261008101530_capture.png) |
| Image format | PNG (JPEG is also available; default JPEG quality is 90) |
- Only if a file with the same name already exists,
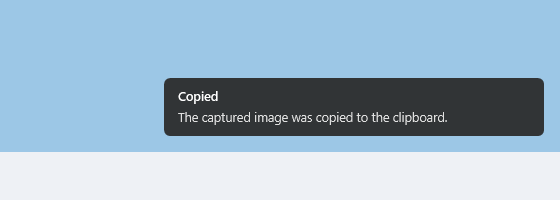
_2,_3, … is added to the end. Existing files are never overwritten. - After saving, a "Saved" notification appears at the bottom right for 4 seconds. Click it to open File Explorer with the saved file selected. It stays while the mouse is over it.
Save as
Choose any location and file name in the standard Windows save dialog. A .jpg extension saves as JPEG, and .png saves as PNG. If you enter any other extension, the extension of the selected type (.png or .jpg) is added, and AreaShot asks before replacing a file that already has that name.
- The dialog opens in the folder you last used with "Save as" (remembered even after AreaShot exits). This folder is the same as the folder for sequential numbers: after you save with "Save as", that folder becomes the next folder for sequential numbers.
- The initial file name follows the file naming (with sequential numbers, the next number such as
003). The description window does not open, even with "Sequential number + description"; type the description into the file name directly. - "Save as" does not change the save folder used by "Save to folder" with the file name template.
Saving with sequential numbers (images for manuals and guides)
When the file naming is "Sequential number" or "Sequential number + description", captures are saved with numbers in the order you take them: 001, 002, … (from version 1.3.0).
What it is for
When you write a procedure manual or a guide, you capture many screens in the order of the steps. With date-and-time file names, it is hard to tell later which image belongs to which step. With sequential numbers, the capture order becomes the number, and the images are easy to organize later.
| File naming | Suited for |
|---|---|
| Sequential number | Only a number is used: 001.png, 002.png, … Write down what each screen shows separately and match it by number. |
| Sequential number + description | You enter a description when saving, and it becomes part of the file name, such as 001_Open settings.png. You can tell what each screen is just from the file name. |
How to use it
- In Settings, choose "Sequential number" or "Sequential number + description" in "File naming", set "Folder for sequential numbers" to a working folder (for example, an
imagesfolder for each manual), and click "Save". - Capture the screens in the order of the steps, and save each with "Save to folder" (S, or hold Ctrl+Shift while releasing the mouse).
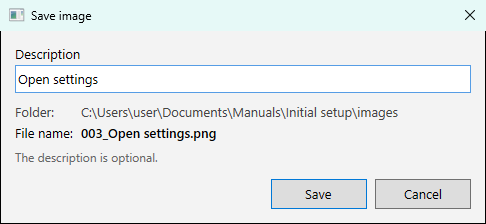
- With "Sequential number + description", the description window opens. Enter what the step does and press Enter to save.
- When you move on to another manual, switch the folder with "Change folder" in the capture dialog or the editor. Numbers continue from the images in each folder.
 (open full-size image)
 (open full-size image)
Entering the description
- The actual file name is shown as you type. Spaces at both ends are removed, and characters that cannot be used in file names (
\ / : * ? " < > |) are replaced with_. - The description is optional. If you leave it blank, only the number is used, such as
003.png. - Press Enter or click "Save" to save. Pressing Enter to confirm Japanese input conversion does not save.
- Press Esc or click "Cancel" to go back without saving (the image is kept).
- If the name is too long, you are asked to shorten it (it is never cut off silently).
- The description is not carried over to the next image.
How numbers are assigned
- AreaShot looks at the PNG and JPEG images in the folder whose names are "a number" or "a number_description", and uses the number after the largest one. Numbers start at
001and have at least 3 digits (1000comes after999). - "Sequential number" and "Sequential number + description", and PNG and JPEG, share the same numbers. Gaps are not filled.
- Date-and-time file names (names starting with 7 or more digits, such as
261013153000_capture.png) are not counted. - After AreaShot restarts, numbering continues from the images in the folder. If you delete the image with the largest number, that number is used again.
- The number is checked again just before saving, so existing images are never overwritten. If another save takes the number while you are entering a description, the new file name is shown; check it and click "Save" again.
Advanced example: combining with an AI that writes manuals
Images taken with "Sequential number + description" carry the order and the step in their file names. If you pass these images to a skill for creating manuals (a way to have generative AI write a manual), it can read the descriptions in the file names and use them as image captions, or link each image to its step and write the text of the procedure.
If an image needs a red frame, an arrow or mosaic, add them in the image editor and then use "Save to folder". The image with your edits is saved with the same numbering.
Image editor
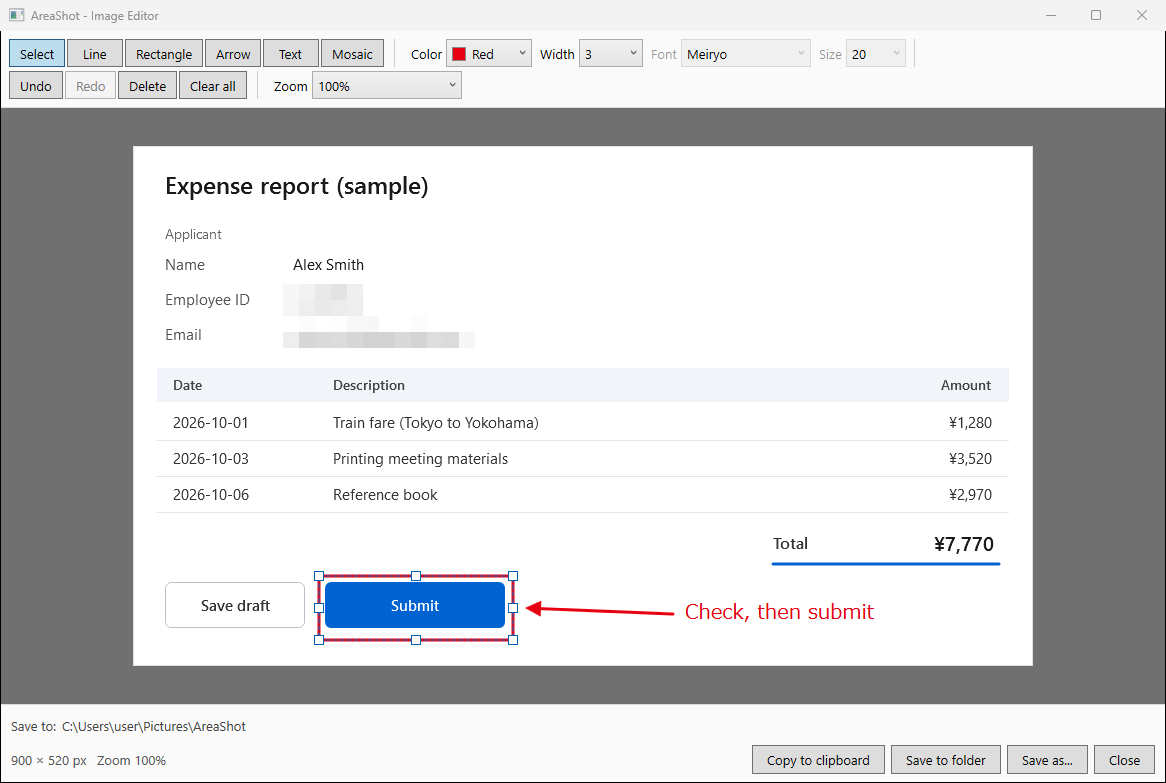
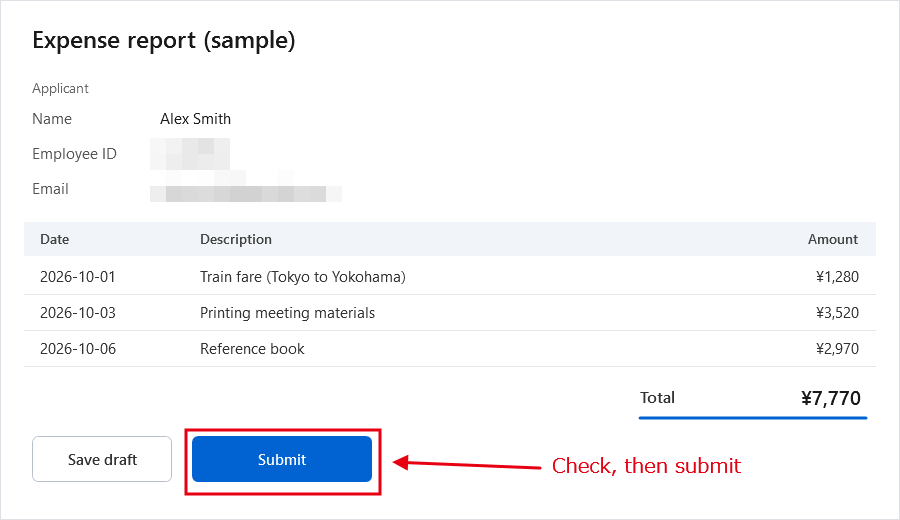
Add lines, rectangles, arrows, text and mosaic to your capture. The tools are limited to what you need to point something out or hide information. Your edits are combined with the image only when you copy or save it.
 (open full-size image)
Tools
| Tool | How to use |
|---|---|
| Select | Click to select and drag to move. Drag the handles of the selected object to change its size or direction. |
| Line | Drag to draw a line, for underlining or separating. |
| Rectangle | Drag to draw a frame (no fill). This tool is selected when the editor opens. |
| Arrow | Drag to draw an arrow that points to where you release. The arrowhead size follows the line width. |
| Text | Click an empty spot and type. Enter finishes, Shift+Enter adds a new line, Esc cancels. Double-click text to edit it again. |
| Mosaic | Drag to pixelate an area. Use it to hide information such as names and email addresses. |
Color, width and text
- Color: Red (default), Black, Blue, Green, Yellow, White
- Width: 1, 2, 3 (default), 5, 8
- Size: 12, 16, 20 (default), 24, 32, 48. Font: Meiryo (default) and other common fonts installed on your PC
- If you change the color or width while an object is selected, the change applies to that object. The last color, width, font and size you used become the defaults next time.
Undo, delete and zoom
- "Undo" (Ctrl+Z) and "Redo" (Ctrl+Y).
- "Delete" (Delete) removes the selected object, and "Clear all" removes all edits. "Clear all" can also be undone.
- Choose a zoom level from 25% to 200% or "Fit to window", or use Ctrl+mouse wheel. Zoom does not change the size of the saved image.
Output
Use "Copy to clipboard", "Save to folder" or "Save as..." at the bottom to output the image with your edits. The editor closes after output. The folder that "Save to folder" saves to is shown at the bottom; with sequential numbers, you can switch it with "Change folder". With "Sequential number + description", you enter a description first, and then the image with your edits is saved.
 (open full-size image)
NoteClosing the editor with "Close" or the × button discards the image and your edits without asking. Copy or save first if you need them.
Examples
Paste straight into a Teams chat or channel
- Press Ctrl+Alt+S and select the area you want to share.
- Hold Ctrl and release the mouse ("Copied" appears).
- Press Ctrl+V in the Teams message box.
Mark up, then paste into Teams
- Select an area, then hold Shift and release the mouse. The image editor opens.
- Draw a rectangle around the spot you want people to look at (Rectangle is already selected), and add arrows or text if needed.
- Click "Copy to clipboard" and press Ctrl+V in the Teams message box.
Capture a series of screens for an operation manual
- In Settings, set the file naming to "Sequential number" or "Sequential number + description", and set the folder for sequential numbers to a folder for the manual (see Saving with sequential numbers).
- For each screen, select the area, then hold Ctrl+Shift and release the mouse. Captures are saved with numbers:
001,002, … (with a description, you enter it before saving). - Add rectangles or arrows in the editor where emphasis is needed, and hide personal information with mosaic.
Settings
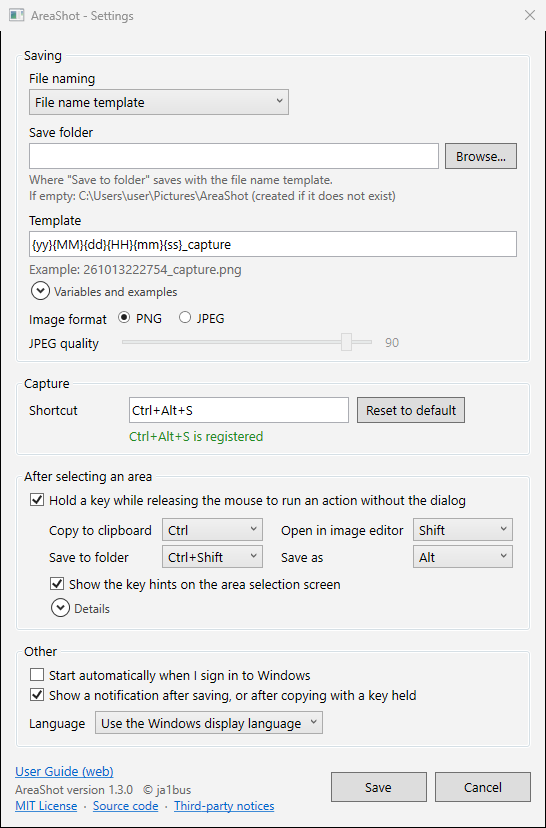
Right-click the notification area icon and choose "Settings...". If the window does not fit on the screen, you can scroll it ("Save" and "Cancel" always stay at the bottom). Changes take effect when you click "Save". Closing with "Cancel" or Esc discards your changes.
 (open full-size image)
| Item | Description |
|---|---|
| File naming | Choose "File name template" (default), "Sequential number" or "Sequential number + description" (see Saving and file names). The folder and file name boxes below change to match. Switching keeps what you entered in each. |
| Save folder | Where "Save to folder" saves images with the file name template. If empty, Pictures\AreaShot is used. Environment variables such as %USERPROFILE% can be used. |
| Template | The file name pattern. You can use {yyyy} (4-digit year), {yy} (2-digit year), {MM} (month), {dd} (day), {HH} (hour, 24h), {mm} (minute) and {ss} (second). An example is shown below the box; click "Variables and examples" to see the list and examples. |
| Folder for sequential numbers | Where "Sequential number" and "Sequential number + description" save images (see Saving with sequential numbers). It also changes with "Change folder" in the capture dialog or the editor, and when you save with "Save as". At first it is the same as the save folder. |
| Image format / JPEG quality | PNG or JPEG. JPEG quality is 1–100. |
| Shortcut | The keys that start a capture. Click the box and press the combination you want. It must include Ctrl, Alt or Win (F1–F24, PrintScreen, Pause and ScrollLock can be used alone). Leave it empty to have no shortcut and capture from the notification area menu instead. Whether the shortcut was registered is shown below the box. |
| After selecting an area | Turns hold and release on or off, sets the key for each action (None, Ctrl, Shift, Ctrl+Shift, Alt), and shows or hides the key hints. The same key cannot be assigned to more than one action. Click "Details" to see how the feature works. |
| Start automatically when I sign in to Windows | Starts AreaShot when you sign in to Windows (off by default). If you turned AreaShot off in Startup apps (Windows Settings or Task Manager), turn it back on there. |
| Show a notification | Shows a notification after saving, or after copying with a key held (on by default). |
| Language | Choose "Use the Windows display language", "English" or "日本語". The change takes effect after AreaShot restarts; when you save, AreaShot asks whether to restart now. |
| User Guide (web) | Opens this guide in your browser: the Japanese guide if the display language is Japanese, otherwise the English guide. |
| MIT License / Source code / Third-party notices | AreaShot is open-source software released under the MIT License (version 1.2.0 and later). "MIT License" shows the full license text, "Source code" opens the public repository on GitHub, and "Third-party notices" shows the notices for .NET and other software. |
Keyboard reference
| Where | Keys | Action |
|---|---|---|
| Waiting | Ctrl+Alt+S (configurable) | Start a capture |
| Selecting an area | Esc / right-click | Cancel (right-click while dragging starts over) |
| Selecting an area | Hold Ctrl / Shift / Ctrl+Shift / Alt and release | Copy / Editor / Save to folder / Save as (defaults) |
| Capture dialog | C, Enter / S / A / E / R / Esc | Copy / Save to folder / Save as / Editor / Retry / Close |
| Description window | Enter / Esc | Save / go back without saving |
| Editor | Ctrl+Z | Undo |
| Editor | Ctrl+Y / Ctrl+Shift+Z | Redo |
| Editor | Delete | Delete the selected object |
| Editor | Esc | Cancel the current drag, or clear the selection |
| Editor | Ctrl+mouse wheel | Change the zoom |
| Typing text | Enter / Shift+Enter / Esc | Finish / New line / Cancel |
| Settings | Esc | Discard changes and close |
Troubleshooting
Pressing the shortcut does not start a capture
Another app or Windows may be using that key combination. If AreaShot cannot register it at startup, a notification appears and the notification area menu shows "failed". Choose a different combination in Settings. You can still capture from the notification area menu in the meantime.
If you use PrintScreen as the shortcut, it cannot be registered while the Windows setting "Use the Print screen key to open screen capture" is on.
Saving failed
If AreaShot cannot write to the save folder (no permission, missing drive and so on), it shows the reason and the folder, and keeps the window open. Use "Save as" to save somewhere else, or change the save folder in Settings.
Sequential numbers are not what I expected
The next number is the one after the largest number among the images in the folder. Gaps are not filled. If numbers continue from the images of another task, use "Change folder" in the capture dialog to use a separate folder for each task. A folder that has reached 999999 cannot be used.
A message says the image could not be copied
Another app may be using the clipboard. Wait a moment and copy again. The window stays open, so the image is not lost.
The mouse pointer is not in the image
This is by design. AreaShot captures the screen without the mouse pointer. Use an arrow or rectangle in the editor to point at something.
Part of the screen is captured as black
Content protected from capture, such as copy-protected video, appears black.
I changed the language but the display did not change
Language changes take effect when AreaShot restarts. If you chose "No" when asked to restart, choose "Exit" from the notification area menu and start AreaShot again.
Where are the settings and logs stored?
Settings are stored in %LOCALAPPDATA%\AreaShot\settings.json. The error log (error.log) is in the same folder. In the Microsoft Store version, Windows keeps them in a folder it manages for each app (AreaShot's folder under %LOCALAPPDATA%\Packages\), and they are removed when you uninstall. If the settings file cannot be read, AreaShot keeps the original under a different name and starts with the default settings.
Privacy
AreaShot does not communicate over the internet. Captured images are only copied to the clipboard or saved to files when you choose to, and are never sent anywhere. See the Privacy Policy for details.