PresenterTools User Guide
A Windows tool that shows your audience exactly where to look, whenever you explain something on screen.
Pointer highlight, laser, magnifier and key display, all while you keep working as usual.
- STEP 1Start PresenterTools (the control panel opens)
- STEP 2Turn on the features you need in the control panel
- STEP 3Share your screen in Teams or put it on a projector
- STEP 4Explain while you work as usual
Contents
About PresenterTools
PresenterTools does more than make the mouse pointer stand out. It is built for every situation where you explain something on screen: screen sharing in online meetings, presentations in a meeting room, IT training and hands-on sessions.
It simply draws a transparent layer on top of the screen, so you keep using PowerPoint, Excel, your browser or a terminal exactly as before. Turn on only the features you need and switch between them without interrupting your talk.
Where it helps and key features (also on the overview page)
Where it helps
Never lose the pointer in a Teams share
In a shared screen the mouse pointer is small, and it is hard to tell what you are pointing at. PresenterTools draws a ring around the cursor and shows each click as a ripple, so just leaving it running turns your everyday actions into ones your audience can follow.
A laser pointer only when you need it
While you hold a key you assign, the cursor trail glows like a laser pointer and gradually fades away. Use the normal mouse most of the time and switch to the laser only for the moments that matter, without breaking the rhythm of your talk.
Enlarge just the part that matters
Show the figures in a table, small text in a settings dialog, or any detail you want people to read in an enlarged window next to the cursor. The rest of the screen stays as it is, so your audience never loses track of where you are.
Show what you type and which keys you press
Commands you type and shortcuts you press appear in large letters at the bottom of the screen. Trainees see at a glance what was entered and which keys were pressed, and can follow the steps even if they missed what you said.
Highlights
Never gets in your way
Everything is drawn on a transparent layer that does not take clicks. Clicks, drags, scrolling and typing go straight to the app underneath.
Turn features on and off instantly
Each of the five features can be switched on its own from a small control panel or with shortcuts. Turn Master off to hide everything at once.
Adjust the look live
Colors, sizes and durations are applied to the screen as soon as you change them in Settings, so you can tune them for the meeting room or the quality of the share while you watch.
Designed to be safe
Key display and the magnifier are always off at startup. Typed text and screen images are never saved or sent, and the app does not communicate over the internet.
Requirements and availability
| OS | Windows 11 (64-bit) |
|---|---|
| Language | English and Japanese (follows the Windows display language; you can also choose one in Settings) |
| Availability | Install PresenterTools for free from the Microsoft Store. |
Starting and the control panel
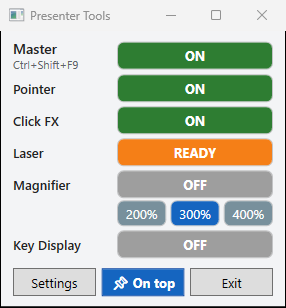
When you start PresenterTools, a small control panel opens and an icon appears in the notification area at the bottom right of the screen. The first time, the control panel appears at the bottom right of the main monitor. Its position and width are remembered for the next start.
 (open full-size image)
Each button turns its feature on or off. The button color shows the current state at a glance.
| Shown | Meaning |
|---|---|
| ON | The feature is on. |
| OFF | The feature is off. |
| READY | The laser is standing by. Press the drawing key to start drawing. |
| ACTIVE | The laser is drawing. |
| Item | Description |
|---|---|
| Master | Turns all display on or off at once. When it is off, nothing is shown, and the rows are dimmed with "(Master OFF)". Each feature's on/off state is kept, so turning Master back on resumes where you left off. |
| Pointer | Cursor highlight |
| Click FX | Click effects |
| Laser | Makes the laser ready to use (READY), or turns it off. |
| Magnifier | Turns the magnifier on or off. Choose the zoom with [200%], [300%] and [400%] below it. |
| Key Display | Turns key display on or off. Turning it off also clears any text on screen immediately. |
| [Settings] | Opens Settings. |
| [📌 On top] | While on (dark blue), keeps the control panel in front of other windows. |
| [Exit] | Exits PresenterTools. |
- The small text under each item is the shortcut assigned to that feature (nothing is shown if none is assigned).
- The × button only hides the control panel; PresenterTools keeps running. To show it again, press Ctrl+Shift+F10 or double-click the notification area icon.
- The height of the control panel follows its content. You can change only its width.
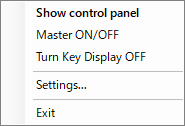
Notification area menu
 (open full-size image)
| Menu | Description |
|---|---|
| Show control panel | Shows the hidden control panel. |
| Master ON/OFF | Turns all display on or off at once. |
| Turn Key Display OFF | Makes sure key display is off. |
| Settings... | Opens Settings. |
| Exit | Exits PresenterTools. |
Cursor highlight
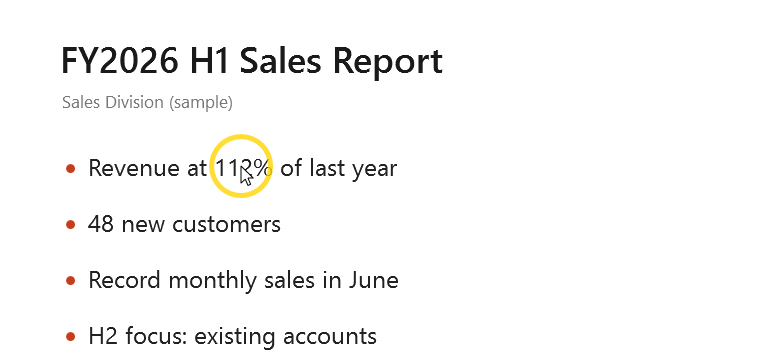
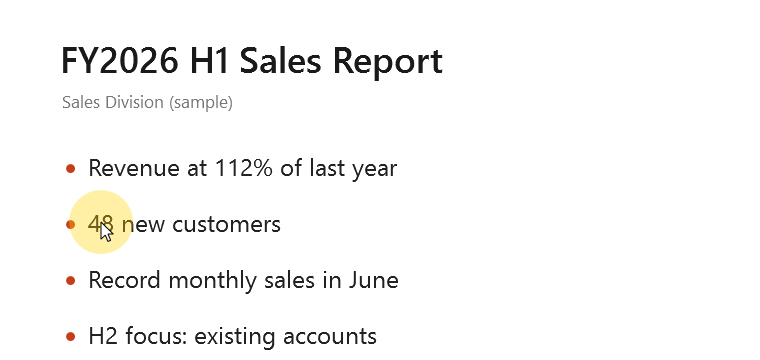
Draws a colored ring around the mouse cursor so its position stands out. The ring follows the cursor as you move it. The Windows mouse cursor itself is not changed.
 (open full-size image)
 (open full-size image)
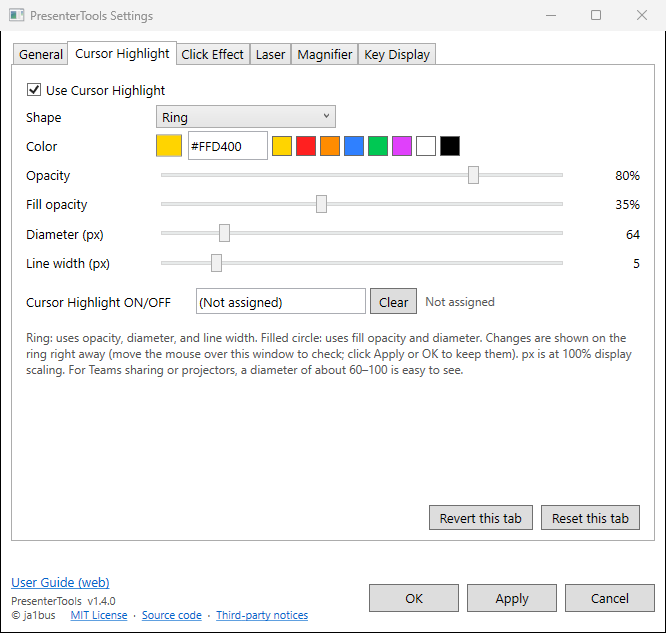
- Choose the shape, "Ring" or "Filled circle (highlighter)". You can also change the color, opacity, diameter and line width.
- For Teams sharing or projectors, a diameter of about 60–100 is easy to see.
- While the laser is drawing, the ring is hidden so that it does not overlap the laser dot.
 (open full-size image)
Click effects
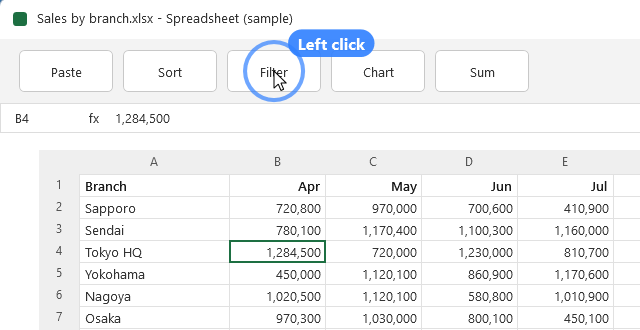
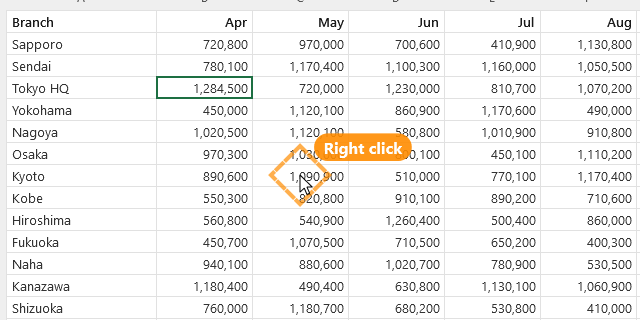
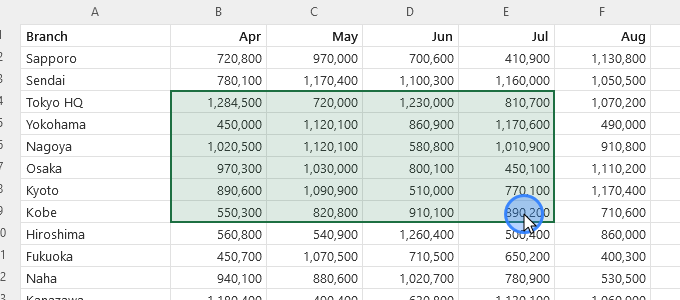
Shows a ripple that grows and fades where you click, so your audience can see "I clicked here". This is useful when you walk through a procedure. Left and right clicks differ in color, shape and line style.
 (open full-size image)
 (open full-size image)
Options that make it even clearer
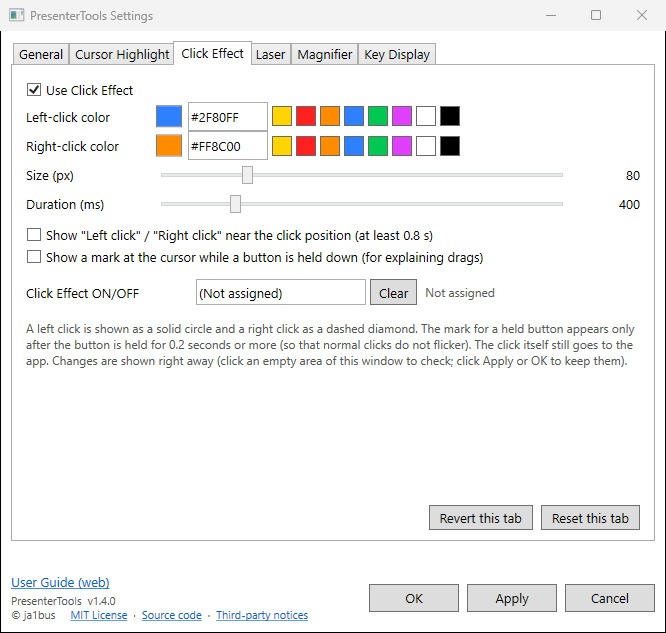
In the Click Effect tab in Settings, you can add the following (both are off by default).
- "Left click" / "Right click" labels: show the button name near the click position (as in the images above). Handy when you also want to say which button was clicked.
- A mark while a button is held down: when you hold a button for 0.2 seconds or more, a translucent circle follows the cursor until you release it. Ideal for explaining drags, such as selecting a range or moving a file.
 (open full-size image)
You can also change the ripple colors, size and duration. The click itself still goes to the app, so you work as usual.
 (open full-size image)
Laser
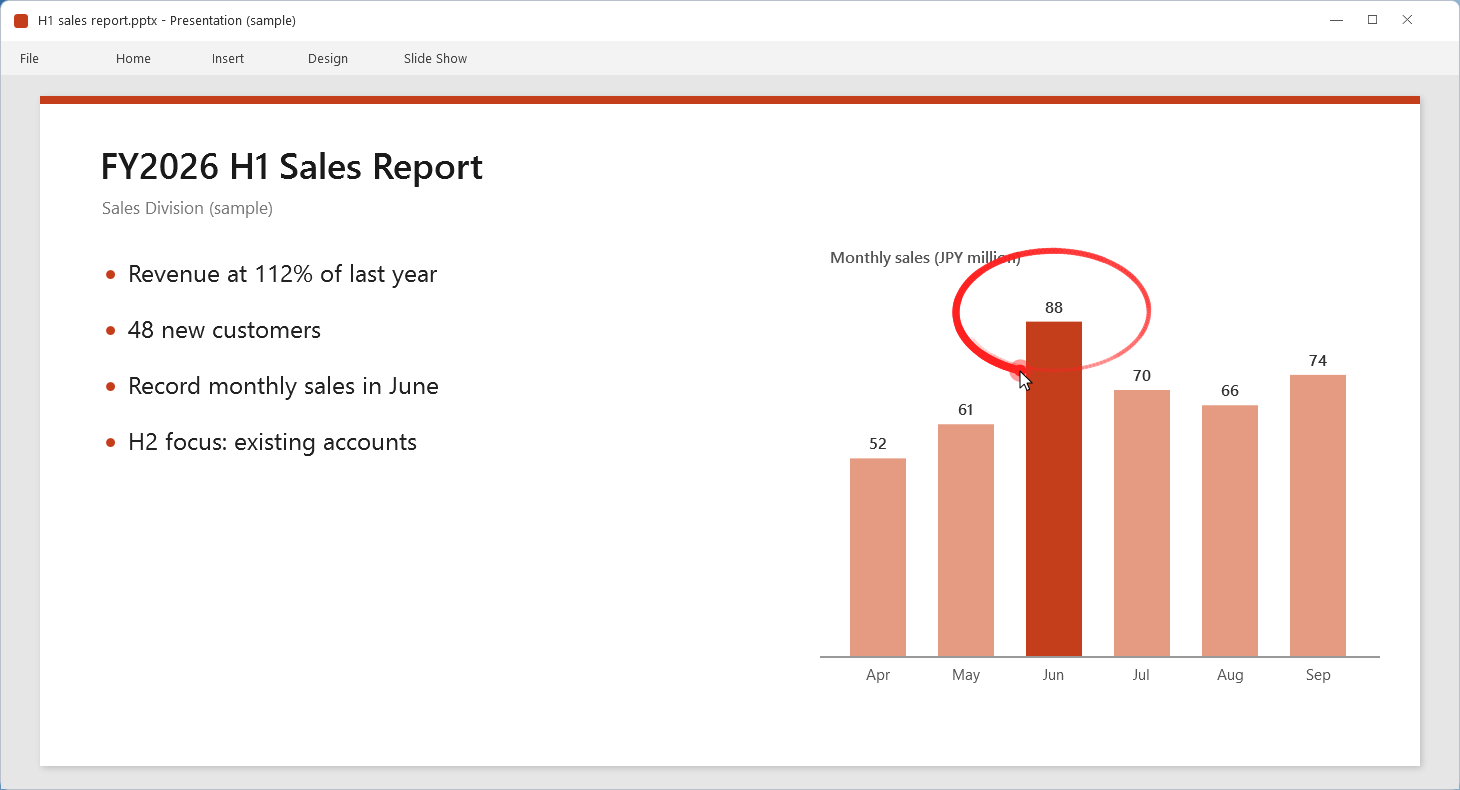
While you hold a key you assign, the cursor trail is drawn like a glowing laser pointer. The line fades from its tail, so there is nothing to erase. Circle a figure in a chart or underline the row you want people to look at.
 (open full-size image)
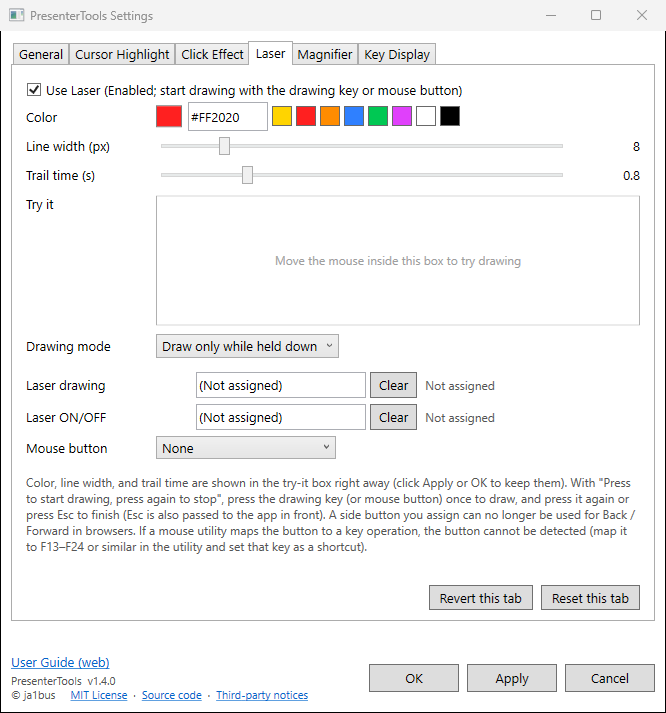
FirstNo key is assigned to drawing (Laser drawing) by default. Before you use the laser, assign a key that is easy to press as follows.
- Click [Settings] in the control panel and open the Laser tab.
- Click the "Laser drawing" box and press the key combination you want to use (for example Ctrl+Shift+F1; choose a combination you do not use elsewhere).
- Click [OK]. The key appears under Laser in the control panel as "Draw:".
- Make sure Laser in the control panel shows READY, then move the mouse while holding the key. While drawing it shows ACTIVE.
 (open full-size image)
Drawing mode
| Drawing mode | Behavior |
|---|---|
| Draw only while held down (default) | Draws only while you hold the key. Release it to stop. |
| Press to start drawing, press again to stop | Press once to start drawing, and press again or press Esc to stop. You do not have to keep holding the key, which helps during long explanations or when you want to focus on the mouse. |
- You can also assign a mouse side button (XButton1 "Back" / XButton2 "Forward") to drawing. An assigned button can no longer be used for Back / Forward in browsers.
- Clicks and drags still go to the app while you draw.
- You can change the color, line width and trail time (how long the line takes to fade).
Magnifier
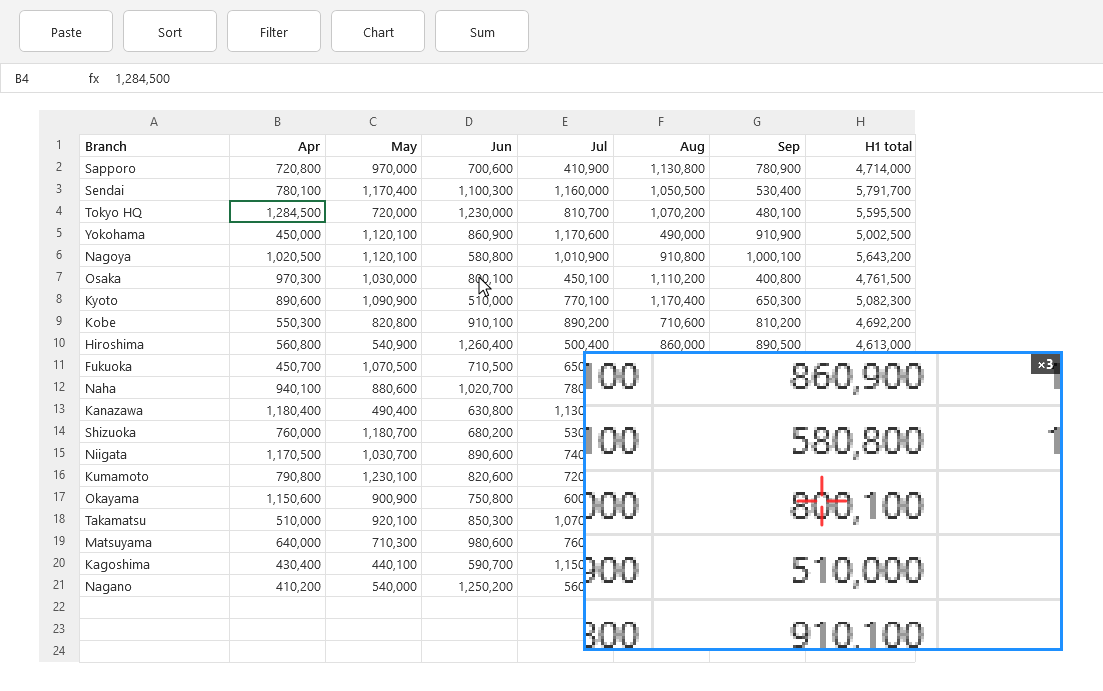
Shows a small window with the area around the cursor enlarged, right next to the cursor. Use it to show figures in a table, small text in a settings dialog or a piece of code, anything you want people to actually read. Since the whole screen is not zoomed, your audience never loses track of where you are.
 (open full-size image)
- Turn it on or off with the Magnifier button in the control panel. You can also assign a shortcut or a mouse side button.
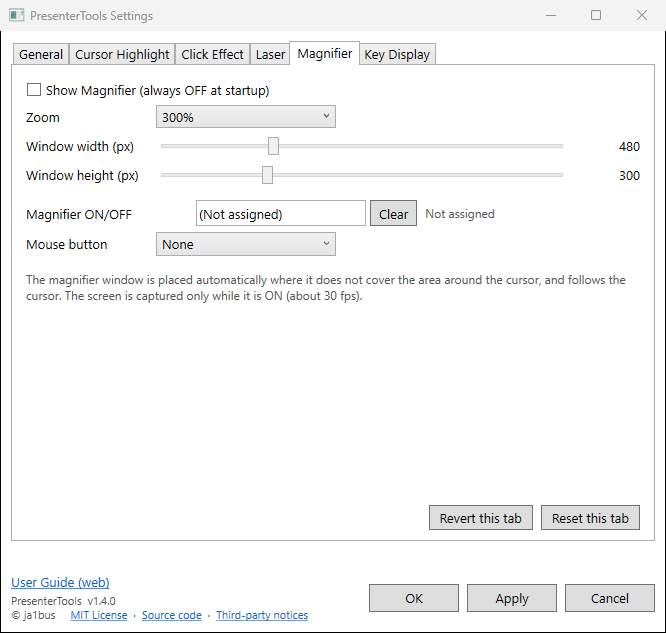
- Choose a zoom of 200%, 300% (default) or 400%. The buttons in the control panel change it instantly, even while it is shown.
- The red cross in the window marks the cursor position. The zoom (for example ×3) is shown in the upper right.
- You can change the window size (480 × 300 by default) in Settings.
- The magnifier is always off at startup. The screen is captured only while it is on, and the image is used only for display.
PresenterTools' own display, such as the cursor ring and the laser, also appears enlarged in the magnifier. If the ring is distracting, turn the cursor highlight off or make its diameter smaller. Copy-protected content such as some videos appears black.
 (open full-size image)
Key display
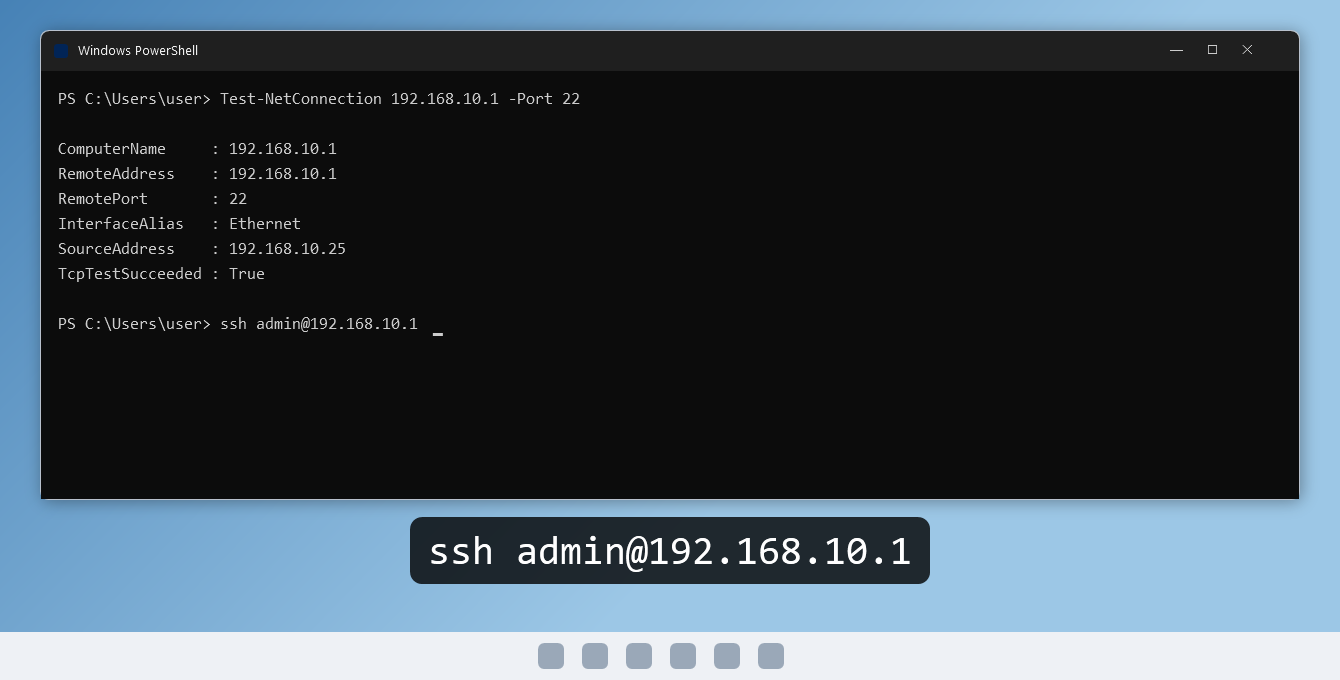
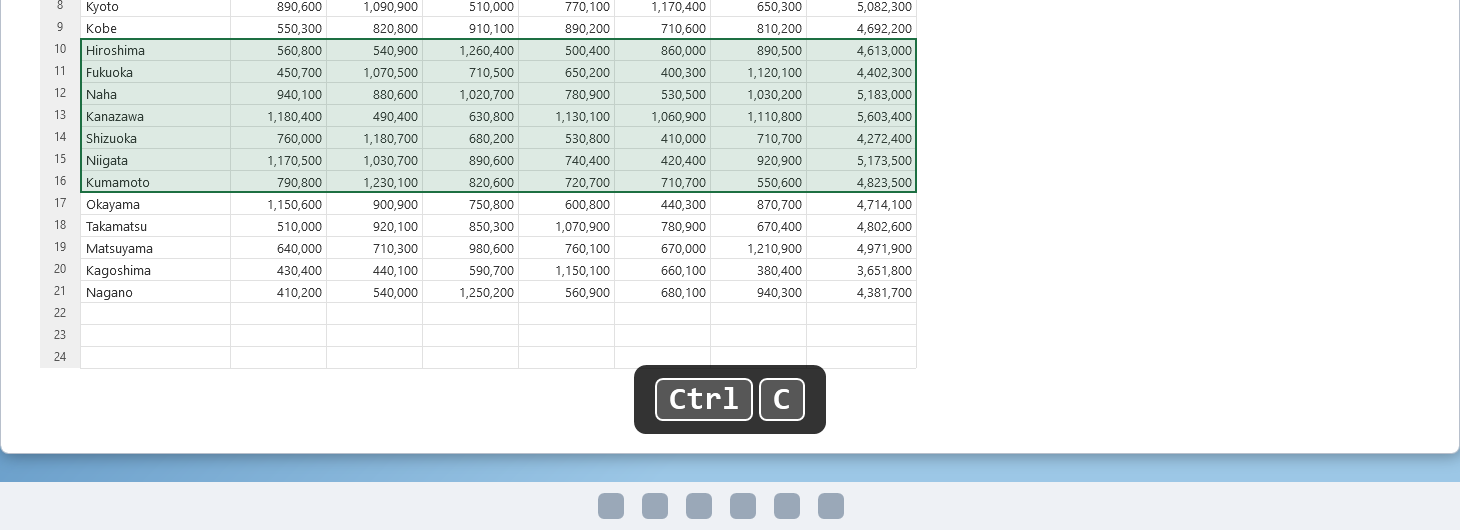
Shows the text you type and the shortcuts you press in large letters at the bottom of the screen. In command-line training, shortcut tips sessions or step-by-step demos, people who cannot see your keyboard still see exactly what you entered.
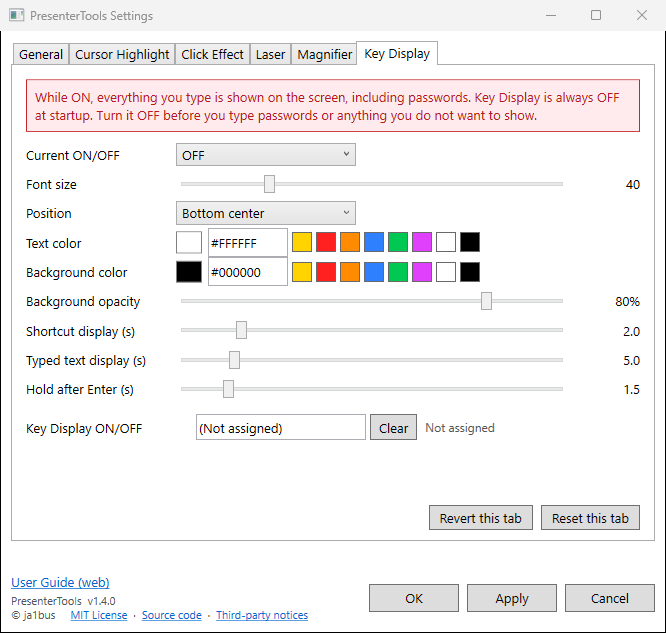
CautionWhile key display is on, everything you type is shown on the screen, including passwords, and people you share your screen with can see it too. Always turn it off before typing passwords or anything you do not want to show (with the control panel button, a shortcut, or "Turn Key Display OFF" in the notification area menu). It is always off at startup.
 (open full-size image)
 (open full-size image)
How it is shown
- Characters you type are shown as one line of text. Backspace removes one character.
- Pressing Enter adds "↵" at the end, and the text disappears shortly after. The text also disappears 5 seconds after your last key press.
- Shortcuts with Ctrl, Alt or Win (for example Ctrl+C) and special keys such as Tab, Esc, the arrow keys and F1–F24 are shown as keycaps. Pressing the same keys again adds "×2", "×3" and so on.
- The text is up to 80 characters. Longer text is shown from the end, with the beginning replaced by "…".
- You can change the position (bottom center, bottom left, bottom right, top center, top left, top right), font size, text color, background color and opacity, and display times.
- PresenterTools' own shortcuts are not shown by default.
While a Japanese input method (IME) is on, the romaji before conversion (for example nihongo) is shown. Typing in windows running as administrator (such as an administrator PowerShell) is not shown. The result of editing, such as moving with arrow keys or Tab completion, is not reflected in the text.
 (open full-size image)
Using it with Teams
PresenterTools draws on top of your own screen whether or not you are sharing it. When you share your screen (the entire monitor) in Teams, everything it draws is shared as well.
| What you share | PresenterTools display |
|---|---|
| Screen (desktop / entire monitor) | Visible to others (recommended). |
| Window (a single app) | Not visible to others. Only the Windows mouse cursor is shared. |
- With two monitors, work on the monitor you are sharing. Key display appears on the monitor with the window you are working in.
- If you do not want others to see the control panel, place it on a monitor you are not sharing, or hide it with the × button (shortcuts keep working).
- It works the same way on meeting-room projectors and large displays.
Shortcuts
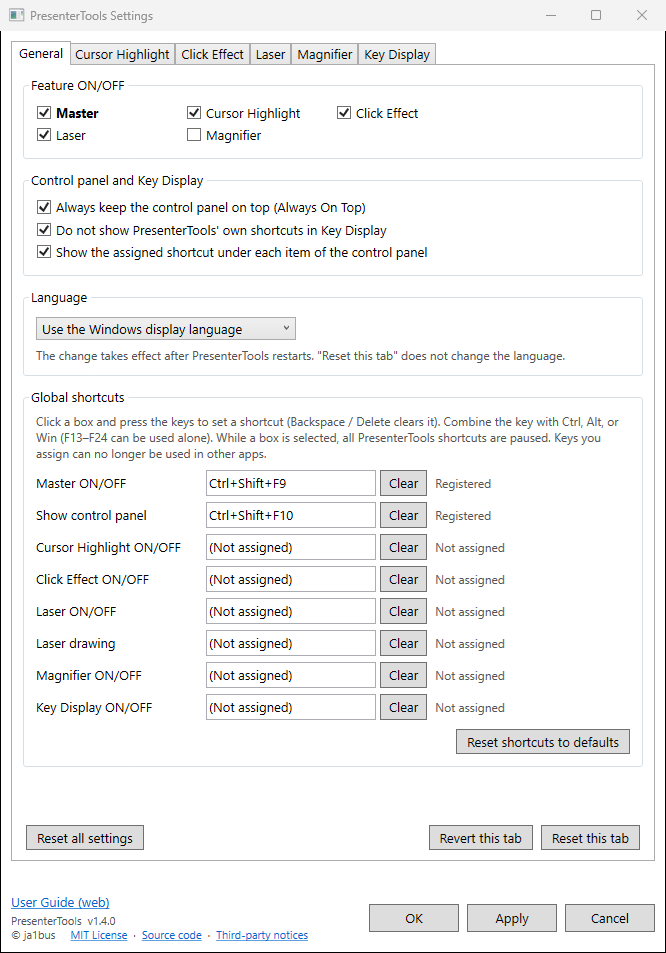
Shortcuts work even when PresenterTools is behind other windows or the control panel is hidden. Only the two below are assigned by default. For the other actions, assign free keys that are easy for you to press.
| Action | Default key |
|---|---|
| Master ON/OFF | Ctrl+Shift+F9 |
| Show control panel | Ctrl+Shift+F10 |
| Laser drawing (hold, or press to toggle) | Not assigned |
| Laser ON/OFF | Not assigned |
| Magnifier ON/OFF | Not assigned |
| Key Display ON/OFF | Not assigned |
| Cursor Highlight ON/OFF | Not assigned |
| Click Effect ON/OFF | Not assigned |
Assigning a shortcut
In the General tab in Settings (or the tab for each feature), click a box and press the keys you want to assign. Combine the key with Ctrl, Alt or Win (F13–F24 can be used alone). Backspace, Delete or [Clear] removes the shortcut.
 (open full-size image)
- Keys you assign can no longer be used in other apps (for example, an app that uses Ctrl+Shift+F9). If that is a problem, choose another key.
- Keys already used by another app or Windows cannot be registered. In that case, "Already used by another app or Windows" is shown, and the control panel shows "⚠ shortcut(s) could not be registered". Choose a different key.
- While a shortcut box is selected, all PresenterTools shortcuts are paused so that the keys you press go into the box. They work again when you select another item or switch to another window.
Settings
Open Settings with [Settings] in the control panel or "Settings..." in the notification area menu. The settings for each feature are grouped on tabs.
| Tab | Main settings |
|---|---|
| General | Feature ON/OFF, keeping the control panel on top, showing shortcuts in the control panel, language, all shortcuts |
| Cursor Highlight | Shape, color, opacity, diameter, line width (Cursor highlight) |
| Click Effect | Left and right colors, size, duration, labels, hold mark (Click effects) |
| Laser | Color, line width, trail time, try-it box, drawing mode, shortcuts, mouse button (Laser) |
| Magnifier | Zoom, window size, mouse button, shortcut (Magnifier) |
| Key Display | ON/OFF, font size, position, colors, display times (Key display) |
- Visual settings such as colors and sizes are applied to the screen as soon as you change them, so you can adjust them while you watch.
- Click [Apply] or [OK] to keep the changes. Click [Cancel] to close and go back to how things were when you opened Settings.
- The version is shown in the lower left of Settings.
- Click "User Guide (web)" in the lower left to open this guide in your browser (the Japanese guide when the display language is Japanese, otherwise the English guide).
- PresenterTools is open-source software released under the MIT License (from version 1.4.0). In the lower left, click "MIT License" to see the full license text, "Source code" to open the public repository on GitHub, or "Third-party notices" to see the notices for .NET and other software.
Restoring settings
| Button | What it restores |
|---|---|
| [Revert this tab] on each tab | Restores the values on the tab to what they were when Settings was opened. |
| [Reset this tab] on each tab | Resets the colors, sizes, times and so on of the tab to the defaults (ON/OFF and shortcuts do not change). |
| [Reset shortcuts to defaults] on General | Resets all shortcuts to the defaults. |
| [Reset all settings] on General | Resets all settings, including ON/OFF and shortcuts, to the defaults (the position and size of the control panel, and whether Magnifier and Key Display are on right now, do not change; these two are always off when PresenterTools starts). |
Each of these takes effect when you click [Apply] or [OK].
Language
Under "Language" on the General tab, choose "Use the Windows display language" (default), "English" or "日本語". The change takes effect after PresenterTools restarts. When you click [Apply] or [OK], you are asked whether to restart now.
Troubleshooting
People in Teams cannot see the ring or the laser
If you share a window in Teams, PresenterTools' display is not shared. Share your screen (the entire monitor) instead. With two monitors, also check that you are working on the monitor you are sharing (Using it with Teams).
The laser does not draw
The "Laser drawing" key may not be assigned yet. Assign one as described in Laser. The laser also does not draw when Laser in the control panel is OFF or when Master is off.
A shortcut does not work
A key used by another app or Windows cannot be registered. If the control panel shows "⚠ shortcut(s) could not be registered", choose a different key in Settings. Shortcuts are also paused while a shortcut box in Settings is selected.
I cannot find the control panel
Press Ctrl+Shift+F10 or double-click the notification area icon. If you cannot see the icon, look inside "^" (show hidden icons) on the taskbar.
Key display does not show Japanese characters
This is by design. While a Japanese input method (IME) is on, the romaji before conversion is shown.
Effects stop or keys are not shown in some windows
While a window running as administrator (such as an administrator PowerShell or Task Manager) is in front, click effects and the ring may stop following, and typed keys may not be shown. Shortcuts still work. Nothing can be shown over UAC prompts or the lock screen.
The ring appears inside the magnifier
This is by design. PresenterTools' own display also appears in the magnifier. If it is distracting, turn the cursor highlight off or make its diameter smaller.
The language did not change
A language change takes effect when PresenterTools restarts. If you answered "No" when asked, exit with [Exit] in the control panel and start it again.
Where are the settings and logs stored?
Settings are stored in %LocalAppData%\PresenterTools\settings.json (paste it into the File Explorer address bar to open it). The error log (error.log) is in the same folder. Deleting this file while PresenterTools is not running restores the default settings. In the Microsoft Store version, Windows keeps them in a folder it manages for each app (PresenterTools' folder under %LOCALAPPDATA%\Packages\), and they are removed when you uninstall.
How do I exit?
Click [Exit] in the control panel, or right-click the notification area icon and choose "Exit". The × button of the control panel does not exit the app.
Privacy
PresenterTools does not communicate over the internet. Mouse and keyboard input and the screen images captured by the magnifier are used only for what is shown at that moment; they are never saved to files or sent anywhere. For details, see the Privacy Policy.